If you know how to read a fish finder, you know just how powerful these tools are for us anglers. Down imaging, fish finders send sonar vertically from the boat, and side imaging sends sonar horizontally away from the boat.
Both of these have their place on water but knowing when to use them is critical – if we don’t understand what they show or be able to translate that into something useful, it’s going to be much more difficult to catch anything!
Read on to learn everything you need to know about reaching a fish finder or sonar.
How to Read a Fish Finder Sonar
Understanding how to use a fish finder is the key to having success with one. They are made to display information about the bottom of the water column that we cannot see with our eyes. These devices help find fish, identify underwater structures, and understand what is going on at different water depths.
The most important thing you need to know how to do is to identify fish on the fish finder (duh!). Fish finders display two different types of images – fish icons and fish arches.
Fish Icons
The fish icon is a result of the Fish-ID technology. Fish-ID is a sonar return from the device that displays fish locations. This technology can show small details about different types of fish based on their size and shape.
This type of fish finder also displays vegetation, rocks, and schools of fish. Look at the screen and pair the icon with the depth on display to determine depths. Once you’ve done that, you’ll know the size and depth of the fish. Keep in mind that no fish finder is perfect. There are times when the Fish-ID technology will mistake bunches of plants or other material as a school of fish. This is difficult to avoid, so keep it in mind while working your baits.
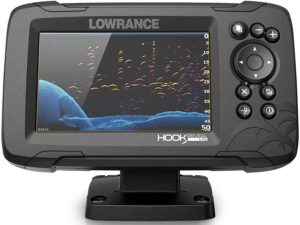
Fish Arches
Arch fish finders are often said to be the most accurate. Reading these fish finders can take some practice, but you’ll have no problem after you’re done with this article. These systems will show arches in the water, and when you get more practice with them, it’s easy to tell what an arch is coming from, whether it’s a rock, vegetation, or fish below. This accuracy is because these units don’t treat one type of object differently than another. They try to identify anything under your boat.
Judging Fish Size
So how are we able to judge the size of a fish from our fish finder? Many factors consider how big a fish is on your screen – even more, if it’s over deep water where there isn’t any reference for ground objects like hills or valleys in shallower waters.
Generally, a more prominent arch means a bigger fish. But there’s more to this as this may not be the case in every situation. You also need to consider three main factors – arch width, arch length, and fullness of the arch.
Arch Width
The width of an arch is a direct indication of the size of the fish. The wider it is, the bigger and more heavy that fish probably is.
Arch Length
A longer length means a larger fish – but not always! Arch Length is partly measuring time. In other words, if a fish isn’t moving much, it will likely have a shorter arch than a fish swimming a lot.
So, If you see an arc going from one side to another on your sonar screen, remember that this could be a small fish swimming quickly across your boat. These discrepancies are why arch length is considered one of the less important factors.
Half Arch or Full Arch
Our final factor is half or full arch on the screen. You’ll see a half-fish arch and an entire fish arc. If a fish swims entirely into the transducer’s cone, you’ll see a full arch. If the fish only swims nearby, not entirely within its range, you’ll see a half arch.
A half arch doesn’t necessarily indicate a small fish, and an entire arch doesn’t necessarily mean a big fish. This reading indicates the location of the fish, so when it comes to size, this is another less important factor.
Identifying Different Types of Underwater Structure
We’ll discuss some of the most common readings on the fish finder – vegetation and weeds, depressions, points, cliiffs and ledges, and other objects.
Weeds and vegetation – This is likely vegetation and weeds if you find spottier readings or vertical lines. This is an excellent place to start since big fish often lurk in places like this.
Depressions – Depressions are good if you’re fishing for bottom feeders like catfish, and these will show as small V dips on the fish finder.
Points – Points are similar to dropoffs but have a more gradual look.
Judging Bottom Types and Hardness
Something else you want to know when learning how to use a fish finder is identifying different types of bottoms.
Where we are fishing can vary between hard rock, soft mud, and grainy sand – the methods used will change slightly based on these factors. The three main factors here are thickness, color, and second return.
Thickness – The thickness of the line combined with your transducer’s chirp will tell you a lot about the bottom of the water beneath you. You’re probably on a hard surface if it returns a thick line and a loud echo. If the line is smaller, you’re probably dealing with something softer like mud. Either of these can be good or bad, depending on the type of fish you’re after.
Color – Color is only a factor on a color fish finder. The darker the color, the more complex the thickness of the surface.
Second return – 2nd returns can often indicate a structure that doesn’t belong, such as a fallen tree. If you receive a 2nd return on the fish finder screen, it is worth narrowing the beam to see if you get a better idea of what it is.
What is Down Imaging?
Down imaging is like traditional sonar or chirp sonar on a fish finder. It is a method to generate an image of the seabed or lakebed.
Down imaging fish finders have higher resolution and can easily show smaller objects on the seabed, such as small rocks, baitfish, urchins, lobster traps, and sandbars.
To read down imaging data, you should:
- Adjust your depth settings so that you are not looking at too deep or shallow a distance (less than 100 ft for sandy/silt bottoms)
- Change your beam width from a wide angle to a narrow angle to see what’s directly below your boat. Be careful because if there is structure nearby, it may be distorted by side echoes this way. You will need to experiment with different settings.
How to Read a Side Imaging Fish Finder
Side imaging is excellent because you can see fish in all directions. Using sonar transducers to send sounds sideways away from a boat allows for better quality images and an understanding of where fish are located on underwater terrain.
Strong knowledge of how high up off the bottom different species like to suspend themselves helps anglers understand what they should be fishing at lower or higher depths depending on their current location. If you’re looking for a solid side imaging fish finder, we wrote an article about the market’s best side imaging fish finders.
What’s the Best Frequency for a Fish Finder?
Finding a dual-frequency fishfinder with 200hHz and 50kHz is a great feature. A high frequency of 200Hz will provide more precise and cleaner imaging but with a smaller cone.
The lower 50kHz offers a more oversized cone but at the expense of clarity and image quality. This is why it’s so important to have both.
The standard range for fish finders is between 50-200 kHz. However, this can vary depending on your needs, such as finding a structure below you versus an open area like offshore fishing, where everything may be deep.
A higher frequency will work well here because it’ll penetrate deeper into the water column than a lower frequency.
What other key features do fish finders have?
The other main features of a fish finder are chart plotting and GPS.
Chart Plotting
Chart plotting is a way to create your map of the bottom and points of interest. This can be very useful if you’re fishing in unfamiliar water or want to keep track of depths and locations for where you found fish.
GPS
GPS coordinates are particularly helpful when navigating at night with limited visibility because they’ll point out dangers like reefs that may be difficult to see otherwise. Depending on what frequency it operates at, it will automatically mark any structure that falls within its range using sonar, downscan, or sidescan.
How are fish finders powered?
Fishfinders are battery-powered and operate on 12V or 24V DC power.
The best way to make sure your fish finder is operating optimally is by keeping it charged with the appropriate voltage power supply (i.e., a 12-volt charger for a 12-volt battery, etc.).
A good rule of thumb: if you’re using your sonar at night, be sure that both the boat’s electric system and the engine ignition switch are off before disconnecting from shore or another vessel. This will prevent any accidental discharge spikes, which may damage sensitive electronics onboard.
In Conclusion – How to Read a Depth Fish Finder
Hopefully, this how-to article helps you understand how to read a fish finder and the best ways to use it. If you’re in the market for a fish finder, check out our round-up of the best fish finders for the money.
Remember these key takeaways:
- The most critical factor in gauging fish size is the fish arc width/thickness
- Try to find a fish finder that operates with both 50 and 200 Hz
- Pay attention to your bottom and look for additional clues with vertical weeds and 2nd returns